มาลองสร้างการ render จาก Virtual DOM เข้า DOM จริงๆ กันดีกว่า


จากคราวที่แล้วที่เราได้อ่านเรื่องการทำงานของ Virtual DOM ของ React 0.x โดยคร่าวๆ และก็ได้สร้าง createElement กับ Function สำหรับการ diff หาค่าที่แตกต่างจาก object ครั้งนี้เราก็มาสร้าง DOM จากค่าที่ได้และ Render เข้า DOM จริงกันดีกว่า~
สำหรับใครที่ยังไม่ได้อ่านบทความก่อนหน้า ก็แนะนำให้อ่านก่อนเพราะว่าเนื้อหาเชื่อมกันนะ~
สร้าง node จาก object
หลังจากได้ Diff ทุกอย่างออกมาแล้ว แน่นอนว่าเราต้องการที่จะสร้าง Element นั้นจาก Object ที่เรามี โดยการที่เราจะสร้างสิ่งที่รับแค่แล้วส่งค่ากลับมาได้นั้น แน่นอนว่าต้องเป็น Function แน่นอน
const create = _element => {
}

create(
    createElement(
        "h1",
        null,
        "Hello World"
    )
)
เนื่องจากว่าเรามี object ที่เรามีได้ทำการเลือกเอาเฉพาะส่วนที่จะเป็นจริงๆ มาเรียบร้อยแล้ว ดังนั้นเราสามารถที่จะใช้ for loop เพื่อที่จะสร้าง attribute ขึ้นมาได้เลย
โดยสิ่งที่เราต้องทำก็คือ
- ถ้า Element เป็น string ให้สร้าง textNode แล้วข้าม attributes กับ childNodes ได้เลย
- จด attributes ทั้งหมดแบบ recursive เพื่อกัน attributes ที่เก็บเป็น object
- สร้าง childNodes ด้วยการ appendChild โดยเช็คด้วยว่าเป็น Node หรือ textNode
- ต้องเป็น recursive เพื่อสร้าง child ที่เป็นจนครบทุก node
โดยเริ่มจากเทียบ string ก่อนเพราะมันง่ายสุดแล้ว~
const create = _element => {
    if (typeof _element === "string")
        return document.createTextNode(_element)
}
จากนั้น check attributes ด้วยความที่มันอาจจะมีลึกแค่ไหนก็ได้ เราเลยสร้าง function แยก ซึ่งต้องเป็น recursive
const create = _element => {
    if (typeof _element === "string")
        return document.createTextNode(_element)
},
    applyAttributes = (attributes) => {
    }
โดยปกติแล้วเราสามารถที่จะตั้งค่าของ attributes ด้วย setAttribute() ได้เลยเช่น
<h1 id="title">Hello World</h1>

<script>
    document
        .getElementById("title")
        .setAttribute("class", "-red")
</script>
แต่ว่าในกรณีที่เราเป็น object เราไม่สามารถที่จะทำแบบนี้ได้เนื่องจาก setAttribute สามารถแก้ไขได้เฉพาะ attribute reference ที่เป็น string เท่านั้น ดังนั้นเราไม่สามารถที่จะ:
<h1 id="title">Hello World</h1>

<script>
    document
        .getElementById("title")
        .setAttribute("style.color", "-red")
</script>
ในทางกลับกัน เราสามารถที่จะตั้ง style ให้เป็น string ได้แต่จะเป็นการเขียนทับทั้งหมดทำให้ไม่สามาถแยกตั้งได้:
<h1 id="title" style="font-size: 16px">Hello World</h1>

<script>
    document
        .getElementById("title")
        .setAttribute("style", "color: red;") // font-size: 16px จะหายไป
</script>
แต่เราสามารถใช้ dot notation ในการตั้งได้ เพราะว่าค่าพวกนี้ไม่ได้เป็น readonly เพียงแค่ว่า best practice คือการใช้ function แก้
    document
        .getElementById("title")
        .style
        .color = "red"
applyAttributes
ดังนั้นถ้าต้องการที่จะเขียนเป็น recursive และยังทำตาม best practice อยู่ ก็คือการเช็คว่าเราอยู่ในระดับแรก (shallow) หรือเปล่า และส่ง referene (ref) เพื่อใช้ในการแก้ attribute ที่ไม่ shallow
const applyAttributes = (attributes, ref, shallow = true) => {
}
จากนั้นก็ loop attributes ได้ตามปกติ
const applyAttributes = (attributes, ref, shallow = true) => {
    keys(attributes).forEach(property => {
    }
})
จากนั้นเราก็เช็คประเภทของ property ว่าเป็น object หรือเปล่า ถ้าเป็นก็โยนเข้า applyAttributes แล้วให้ทำไปเรื่อยๆ จนกว่าจะครบ
const applyAttributes = (attributes, ref, shallow = true) => {
    keys(attributes).forEach(property => {
        if (typeof attributes[property] === "object")
            applyAttributes(
                attributes[property],
                ref[property],
                false
            )
    }
})
แต่ถ้าไม่ใช่ object ก็ให้เขียน attributes ได้เลย แต่ก็ต้องเช็คว่ามันยัง shallow อยู่หรือเปล่า ซึ่งถ้าไม่ก็ให้เขียนโดยไม่ใช้ setAttribute()
const applyAttributes = (attributes, ref, shallow = true) => {
    keys(attributes).forEach(property => {
        if (typeof attributes[property] === "object")
            applyAttributes(
                attributes[property],
                ref[property],
                false
            )
        else
            if (shallow)
                ref.setAttribute(property, attributes[property])
            else ref[property] = attributes[property]
    }
})
จากนั้นก็เพิ่มเข้าไปที่ create เพื่อให้ element applyAttributes ได้
const create = _element => {
    if (typeof _element === "string")
        return document.createTextNode(_element)

    let { nodeName, attributes, childNodes } = _element

    let element = document.createElement(nodeName)

    applyAttributes(attributes, element)
},
    applyAttributes = (attributes, ref, shallow = true) => {
        keys(attributes).forEach(property => {
            if (typeof attributes[property] === "object")
                applyAttributes(
                    attributes[property],
                    ref[property],
                    false
                )
            else
                if (shallow)
                    ref.setAttribute(property, attributes[property])
                else ref[property] = attributes[property]
        }
    })
จากนั้นก็เหลือเคสสุดท้ายคือการเปลี่ยน childNodes ทั้งหมดให้กลายเป็น node และ textNodes ด้วยความที่ childNodes เป็น array อยู่แล้ว ดังนั้นเราก็สามารถที่จะ loop ตรงๆ ได้เลย
childNodes.forEach(child => {
})
จากนั้นก็เช็คประเภท ถ้า child เป็น string ก็สร้าง textNode แต่ถ้า child ไม่ใช่ string ก็เป็นได้แค่ node เท่านั้น โดยเราสามารถใช้ create เพื่อสร้าง element ใหม่ได้จนกว่าจะครบทุก node เนื่องจากทุก node มีโครงสร้างเหมือนกัน เราเลยสามารถที่จะใช้ create() เป็น recursive ได้
childNodes.forEach(child => {
    typeof child === "string"
        ? element.appendChild(
                document.createTextNode(child)
            )
        : element.appendChild(create(child))
})
จากนั้นก็ส่ง element ที่เราสร้างขึ้นมาทั้งหมดออกไป ซึ่งจะได้หน้าตา code เป็นประมาณแบบนี้
const create = _element => {
    if (typeof _element === "string")
        return document.createTextNode(_element)

    let { nodeName, attributes, childNodes } = _element

    let element = document.createElement(nodeName)

    applyAttributes(attributes, element)

    typeof child === "string"
        ? element.appendChild(
                document.createTextNode(child)
            )
        : element.appendChild(create(child))

    return element
},
    applyAttributes = (attributes, ref, shallow = true) => {
        keys(attributes).forEach(property => {
            if (typeof attributes[property] === "object")
                applyAttributes(
                    attributes[property],
                    ref[property],
                    false
                )
            else
                if (shallow)
                    ref.setAttribute(property, attributes[property])
                else ref[property] = attributes[property]
        }
    })
ซึ่งถ้าเราลองสร้าง element จาก object ก็จะได้ HTML Element ออกมาแล้ว~
create(
    createElement(
        "h1",
        {
            id: "title",
            style: {
                color: "blue",
                fontSize: "16px"
            }
        },
        "Hello World"
    )
) // <h1 id="title" style="color: blue; font-size: 16px">Hello World</h1>
Render
หลังจากที่เราได้:
- สร้าง object ตัวแทน Element
- หาผลต่างระหว่าง object
- สร้าง Element จาก object
ก็เหลือแค่การ render เข้าสู่ dom จริงเท่านั้น!
โดยถ้าสังเกตจาก React ก็จะใช้วิธีสร้าง root node ขึ้นมาก่อนหนึ่งอันแล้ว render element ของเราเข้าเลย
<div id="root"></div>

ReactDOM.render(<App />, document.getElementById("root"))
ซึ่งเหตุผลที่ root มี child ได้อันเดียวเพราะว่าโครงสร้างของ Virtual DOM ของ React จะเก็บค่า node และ childNodes กี่ตัวก็ได้ โดยใน object นึงจะมี root node ได้แค่ tag เดียว เลยเป็นเหตุผลที่ทำให้ root node ของ React มีได้แค่ตัวเดียวเท่านั้น
โดยเราเริ่มจากการเช็คก่อนว่า root เนี่ยเคยมีการ render หรือยัง ซึ่งถ้ายังก็ให้ appendChild ลงไปได้เลยเพราะไม่มีอะไรให้เทียบ
const render = (node, element) => {
    if (!element.children.length)
        return element.appendChild(create(node))
}
ที่เราใช้ element.children เพราะว่า .childNodes สามารถที่จะมี textNode ได้ในขณะที่ .children จะมีได้แค่ node เท่านั้น
<div id="root">
</div> // childNodes: [textNode: '\n']
ดังนั้นเมื่อเกิดการเว้นบรรทัดหรือมี tab ก็จะถูก append เข้าไปที่ childNodes ไปด้วยทั้งๆ ที่จริงๆ แล้วมันยังไม่เคย render เลย เราเลยใช้ .children แทน .childNodes
แน่นอนว่าการที่เราจะเช็ค node ทั้งหมดนั้น เราไม่รู้ว่ามีกี่ชั้น ดังนั้น render() เลยต้องกลายเป็น recursive ไปโดยปริยาย แต่แน่นอนว่าเราเช็คแค่ root node ว่า render หรือยัง ดังนั้นเราเลยไม่ต้องการ if แรกใน render() สู้ตั้ง function recursive ใหม่เลยดีกว่า
const render = (node, element) => {
    if (!element.children.length)
        return element.appendChild(create(node))

    let applyDiff = (node, ref) => {}

    applyDiff(node, element.childNodes[0])
}
ด้วยความที่ applyDiff จะต้องเป็น recursive และการแก้ไข Element เราจะต้องใช้ reference จาก DOM จริงๆ ในการแก้ ดังนั้นเลยต้องส่ง reference ในการเขียน Element ครั้งต่อไป
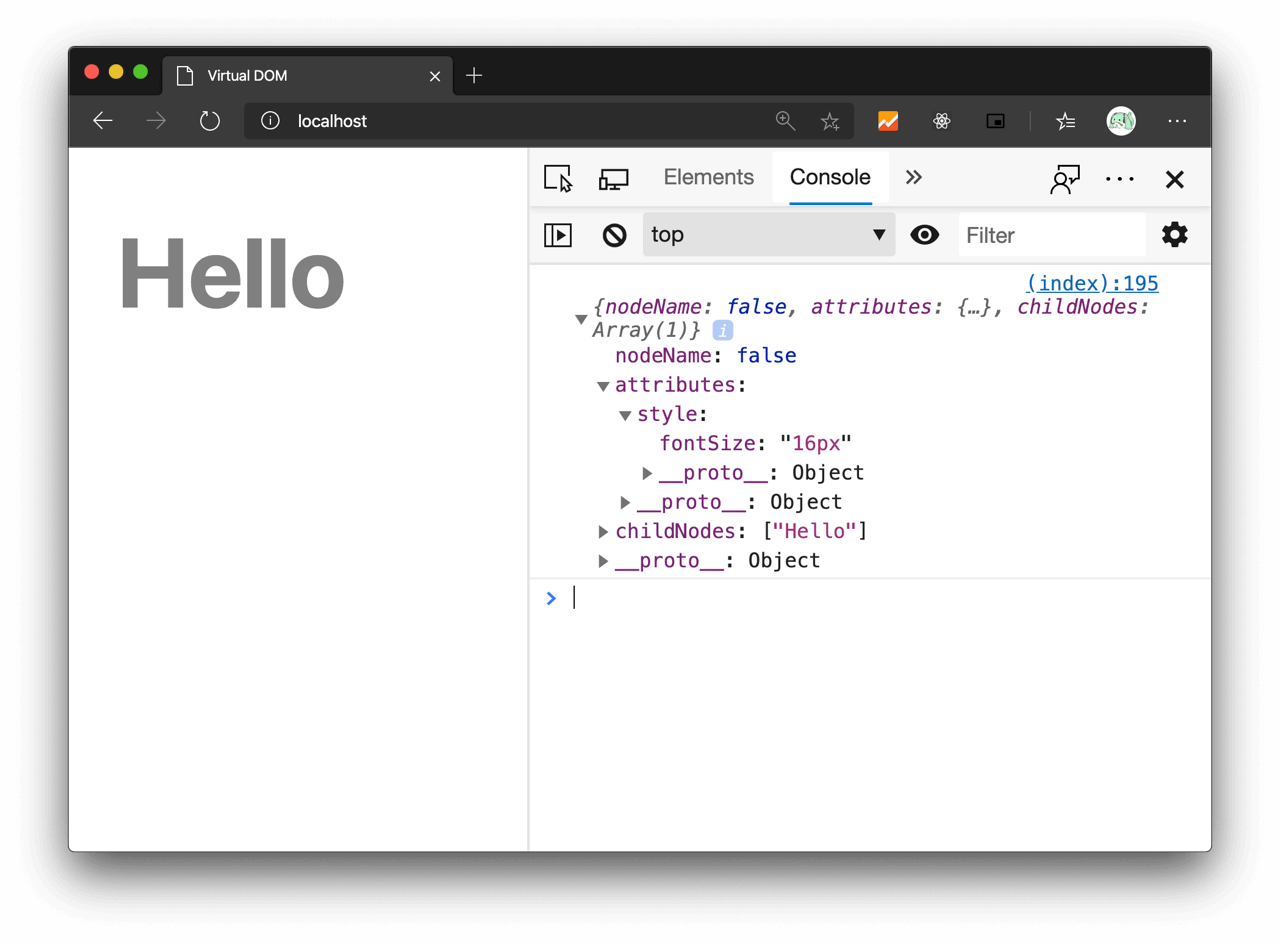
โดยที่การที่เรา pass element.childNodes[0] เข้าไปเพราะเราต้องการให้ childNodes แรกของ root อยู่ในระดับเดียวกับ Virtual Node ที่เราสร้างขึ้นมา
เริ่มจากการเปรียบเทียบก่อนว่าเป็น node หรือ textNode ซึ่งถ้าเป็นก็ต้องเปรียบเทียบกับ reference อีกว่าเป็น string หรือเปล่าเพื่อที่จะเปรียบเทียบได้ ซึ่งถ้าไม่ใช่ก็เขียนทับไปได้เลยด้วย replaceChild
let applyDiff = (node, ref) => {
    if (typeof node === "string")
        if (ref.nodeName === "#text")

        else
            ref.parentElement.replaceChild(
                document.createTextNode(node),
                ref
            )
}
แต่ถ้าเป็น textNode เหมือนกันก็ต้องเช็คอีกว่ามี textContent เหมือนกันหรือเปล่า ที่ต้องเช็คว่าเป็น textNode เหมือนกันหรือเปล่าเพราะว่าบางทีอาจจะมี node ที่มี textContent เหมือนกัน แต่ไม่ได้เป็น textNode
let applyDiff = (node, ref) => {
    if (typeof node === "string")
        if (ref.nodeName === "#text")
            return node !== ref.textContent
                ? ref.textContent = node
                : null
        else
            return ref.parentElement.replaceChild(
                document.createTextNode(node),
                ref
            )
}
nodeName ตัวพิมพ์ใหญ่และเล็ก
จากนั้นก็เช็คว่าเป็น nodeName เดียวกันหรือเปล่า ซึ่งถ้าไม่เป็น node เดียวกันก็สามารถที่จะข้ามการเช็คที่เหลือได้เลย เพราะว่าเราต้อง replaceChild ตรงๆ ได้เลยโดยไม่ต้องสนค่าต่างในการ update
let { nodeName, attributes, childNodes } = node

if (nodeName !== `${ref.nodeName}`.toLowerCase())
    return ref.parentElement.replaceChild(
        create(node),
        ref
    )
ในบางครั้ง nodeName ของเราที่ JavaScript อ่านก็ไม่ได้ก็ไม่ได้ถูกเก็บเป็นตัวพิมพ์เล็กเหมือนที่เราพิมพ์
document.createElement("div").nodeName // DIV
ดังนั้นเวลาเราเปรียบเทียบ เราต้องให้มั่นใจว่า Element 2 ตัวนี้เป็นตัวเดียวกัน
"DIV" === "div" // false
"DIV".toLowerCase() === "div" // true
เราเลยต้องใช้ toLowerCase ในการดักไว้ไม่ให้มีความต่างระหว่างตัวเล็กและตัวใหญ่ในการเปรียบเทียบ nodeName ซึ่งก็จะได้หน้าตาประมาณแบบนี้
let applyDiff = (node, ref) => {
    if (typeof node === "string")
        if (ref.nodeName === "#text")
            return node !== ref.textContent
                ? (ref.textContent = node)
                : null
        else
            return ref.parentElement.replaceChild(
                document.createTextNode(node),
                ref
            )

    let { nodeName, attributes, childNodes } = node

    if (nodeName !== `${ref.nodeName}`.toLowerCase())
        return ref.parentElement.replaceChild(
            create(node),
            ref
        )
}
namedNodeMap กับ attributes object
ถ้าจำได้ก่อนหน้านี้เรามี Function applyAttributes() ที่เอาไว้เพิ่ม Attributes เข้าไปใน Element ที่ถูกสร้างขึ้น โดยจะรับค่า Attributes ที่ diff แล้วและ HTMLElement เข้าไป ดังนั้นการที่เราส่ง Node ไป diff กับ Virtual Node ก็น่าจะไม่มีปัญหา
แต่ว่าใน Node จริง ไม่สามารถเทียบ attributes กับ Virtual Node ได้ตรงๆ เพราะว่า Node เก็บ attributes ในรูปแบบของ namedNodeMap ซึ่งเป็น Symbol ที่เก็บ Object ของ attributes ที่มีการแก้ไข
document.createElement("h1").attributes instanceof NamedNodeMap // true
นอกจากนี้ attributes ที่ไม่ได้อยู่ในชั้นที่ 1 เช่น style เมื่อถูกเขียนแล้ว จะถูก append ไปที่ property ของตัวมันเองซึ่งจะถูก map ให้ตรงกับ namedNodeMap
let title = document.createElement("h1").attributes instanceof NamedNodeMap // true

title.style.fontSize = "16px"
title.style.color = "blue"

title.attributes: namedNodeMap
{
    0: style
    style: {
        name: style,
        value: 'font-size: 16px; color: blue',
        ...styleAttributes
    }
}

title.__proto__
{
    nodeName: 'h1',
    style: {
        0: 'font-size',
        1: 'color',
        ...styleAttributes
    }
    ...attributes
}
ดังนั้นการที่เราจะใช้จะใช้ applyAttributes เข้าไปกับ Node จริงเลยจึงทำไม่ได้ เพราะว่าก่อนหน้านี้เรายัง diff กับ attributes ของ Node จริง กับ Virtual Node ไม่ได้
ดังนั้นวิธีที่ใช้การปรับเปลี่ยน code น้อยที่สุดคือการ map namedNodeMap ให้เป็นในรูปแบบ object ธรรมดาโดยใช้ประโยชน์ DOM เริ่มจากแก Function compareAttributes ให้ดัก HTMLElement เพื่อแยก Node จริงออกจาก Virtual Node
const compareAttributes = (attributes, oldAttributes) => {
    if (oldAttributes instanceof HTMLElement)
        oldAttributes = extractAttributes(oldAttributes)

    ...
}
จากนั้นก็ใช้ประโยชน์ของ namedNodeMap ไล่คีย์จาก Node จริงและเช็ค attributes ตามคีย์ที่ถูกแก้ไข
const extractAttributes = element => {
    let attributes = {}

    Object.keys(element.attributes).forEach(key => {
        let property = element.attributes[key].name
    })
}
แต่ถึงอย่างนั้น attributes ก็เก็บได้ทั้ง string และ object ซึ่ง object มีขนาดลึกสุดได้แค่ 2 ชั้นเท่านั้นนับจาก root เท่านั้น ดังนั้นเราเลยต้องเขียบ attributes ในการเก็บ object ลึกระดับ 2 ชั้นขึ้นมาแทนการทำ recursion ซึ่งถ้าไม่ใช่ object ก็สั่งให้เขียนไปได้เลย
const extractAttributes = element => {
    let attributes = {}

    Object.keys(element.attributes).forEach(key => {
        let property = element.attributes[key].name

        attributes[property] = {}

        typeof element[property] === "object"
            ? null
            : attributes[property] = element[property]
    })
}
จากนั้นก็ loop key ของ object ที่ถูกเก็บเป็น object มาเพื่อเขียบลง attributes อีกที
typeof element[property] === "object"
    ? Array.apply(
            false,
            new Array(element[property].length)
        ).map((_, index) => {
        })
    : attributes[property] = element[property]
แต่ว่าค่าของ namedNodeMap ของ style จะถูกเก็บชื่อเป็นแบบเดียวกับ css ซึ่งไม่ใช่ camelCase และไม่มีอยู่บน HTMLElement ดังนั้นเราเลยต้อง map ชื่อจาก css ให้เป็น javascript
typeof element[property] === "object"
    ? Array.apply(
            false,
            new Array(element[property].length)
        ).map((_, index) => {
            let propertyName = camelize(
                element[property][index]
            )
        })
    : attributes[property] = element[property]
โดยเราสามารถเอา regex มาช่วยในการ replace property ตรงนี้ได้
const camelize = str => {
    return str
        .replace(/(?:^\w|[A-Z]|\b\w)/g, function(word, index) {
            return index === 0
                ? word.toLowerCase()
                : word.toUpperCase()
        })
        .replace(/\s+/g, "")
        .replace(/-/g,"")
}
พอเราได้ชื่อ property มาแล้วการสามารถใช้ reference นี้ในการหา property ได้
typeof element[property] === "object"
    ? Array.apply(
            false,
            new Array(element[property].length)
        ).map((_, index) => {
            let propertyName = camelize(
                element[property][index]
            ),
                propertyValue = element[property][propertyName]
        })
    : attributes[property] = element[property]
จากนั้นก็ส่งค่า property ที่เราหาเจอกลับมาเขียนใน attributes แล้วส่ง attributes ที่ถูกเขียนและถูก mapped เป็น object แล้วกลับไป diff ต่อได้เหมือนกับ Virtual Node ได้เลย
const extractAttributes = element => {
        let attributes = {}

        Object.keys(element.attributes).forEach(key => {
            let property = element.attributes[key].name

            attributes[property] = {}

            typeof element[property] === "object"
                ? Array.apply(
                        false,
                        new Array(element[property].length)
                    ).map((_, index) => {
                        let propertyName = camelize(
                                element[property][index]
                            ),
                            propertyValue =
                                element[property][propertyName]

                        return (attributes[property][
                            propertyName
                        ] = propertyValue)
                    })
                : (attributes[property] = element[property])
        })

        return attributes
    },
    camelize = str => {
        return str
            .replace(/(?:^\w|[A-Z]|\b\w)/g, (word, index) =>
                index === 0
                    ? word.toLowerCase()
                    : word.toUpperCase()
            )
            .replace(/\s+/g, "")
            .replace(/-/g, "")
    },
    diff = (current, old) => {
        if (current.nodeName !== old.nodeName.toLowerCase())
            return current

        let attributes = {},
            childNodes = Array.apply(
                false,
                new Array(current.childNodes.length)
            ).map(() => false)

        if (typeof current.attributes === typeof old.attributes)
            attributes = compareAttributes(current.attributes, old)
        else attributes = current.attributes

        current.childNodes.forEach((child, index) => {
            if (
                typeof child === "string" &&
                child !== old.childNodes[index].textContent
            )
                return (childNodes[index] = child)

            if (
                typeof child !== "string" ||
                typeof old.childNodes !== "object"
            )
                return (childNodes[index] = child)

            let diffedNode = diff(child, old.childNodes[index])

            if (
                !diffedNode.nodeName &&
                !diffedNode.attributes &&
                !diffedNode.childNodes
            )
                return
            else return (childNodes[index] = diffedNode)
        })

        if (!childNodes.filter(child => child !== false).length)
            childNodes = false

        return {
            nodeName: false,
            attributes: keys(attributes).length
                ? attributes
                : false,
            childNodes: keys(childNodes).length ? childNodes : false
        }
    }
กลับมาที่ create หลังจากที่เรา mapped namedNodeMap ให้เป็น object และ diff ได้แล้ว ก็สามารถที่จะ applyAttributes เข้าไปที่ Element ที่ถูกสร้างได้เลย
Render Virtual Node ไป Node จริง
หลังจากที่เราสร้าง function create สำหรับการสร้าง Node จาก Virtual Node ได้แล้ว ก็สามารถที่จะ appendChild หรือ replaceChild ได้แล้วแต่เราจะพิจารณาได้เลย เพราะว่าเราสร้าง Node จริง จาก Virtual Node เรียบร้อยแล้ว
render = (node, element) => {
    if (!element.children.length)
        return element.appendChild(create(node))

    let applyDiff = (node, ref) => {
        if (typeof node === "string")
            if (ref.nodeName === "#text")
                return node !== ref.textContent
                    ? (ref.textContent = node)
                    : null
            else
                return ref.parentElement.replaceChild(
                    document.createTextNode(node),
                    ref
                )

        let { nodeName, attributes, childNodes } = node,
            diffed = diff(node, ref)

        if (nodeName !== `${ref.nodeName}`.toLowerCase())
            return ref.parentElement.replaceChild(
                create(node),
                ref
            )

    }

        applyAttributes(diffed.attributes, ref)
}
หลังจาก diffed ได้ทุกอย่างออกมาเรียบร้อยแล้ว ก็เหลือการแก้ไข child ที่ถูก diffed ออกมาแล้วกับ Node จริงเท่านั้น ซึ่งก็ถ้าเป็น node ก็จะทำเทียบไปเรื่อยๆ จนกว่าจะครบทุก node เพราะว่าโครงสร้างแบบเดียวกัน
childNodes.forEach((child, index) =>
    typeof ref.childNodes[index] !== "undefined"
        ? applyDiff(child, ref.childNodes[index])
        : null
)
แต่ในกรณีที่หาเทียบ node ไม่เจอก็จะถูก append ออกมาเป็น child ใหม่
childNodes.forEach((child, index) =>
    typeof ref.childNodes[index] !== "undefined"
        ? applyDiff(child, ref.childNodes[index])
        : ref.appendChild(create(child))
)
ลบ childNodes ที่เกิน
แต่ว่าใรกรณีนี้เราจะ loop ได้เฉพาะ childNodes ที่เรา request มาใหม่ ซึ่งถ้า node น้อยกว่าอันเก่าก็จะถูกปล่อยไปเลย ดังนนั้นเราต้องเช็คในกรณีที่ Virtual Node น้อยกว่า Node เดิมด้วย
// ไม่ต้องทำต่อทำ vNode มากกว่าหรือเท่ากับ node เดิม
if (childNodes.length >= ref.childNodes.length) return
โดยเราจะ loop ตามจำนวนครั้งของ node ที่เหลืออยู่โดยการเอา (จำนวน node เดิม) - (จำนวน vNode) และเริ่ม loop จากจำนวน node เดิมที่ไม่ถูก loop
Array.apply(
    null,
    new Array(ref.childNodes.length - childNodes.length)
)
    .map((_, index) => index + childNodes.length)
แต่การที่เราลบจากจำนวนในรูปแบบจากมากไปน้อย เวลา childNodes ถูกลบ เดิมที childNodes ถูกเก็บเป็น stack ดังนั้นถ้าถูกลบในรูปแบบจากมากไปน้อย index ของ childNodes จะถูกเลื่อนทำให้เราไม่สามารถลบ node ทั้งหมดได้แต่จะลบ node ได้เป็นจำนวน Math.ceil(n / 2)
ดังนั้นเราต้อง removeChild จาก index หลังสุดมาแรกสุดเพื่อไม่ให้ stack childNodes ถูกเลื่อน
Array.apply(
    null,
    new Array(ref.childNodes.length - childNodes.length)
)
    .map((_, index) => index + childNodes.length)
    .reverse() // Otherwise child stack will auto update
    .forEach(index =>
        ref.removeChild(ref.childNodes[index])
    )
ซึ่งตอนนี้เราได้สร้าง render() ที่จะ render node ตั้งแต่ node แรกไปถึง node สุดท้ายได้แล้ว ซึ่งมีหน้าตาประมาณนี้
const render = (node, element) => {
        if (!element.children.length)
            return element.appendChild(create(node))

        let applyDiff = (node, ref) => {
            if (typeof node === "string")
                if (ref.nodeName === "#text")
                    return node !== ref.textContent
                        ? (ref.textContent = node)
                        : null
                else
                    return ref.parentElement.replaceChild(
                        document.createTextNode(node),
                        ref
                    )

            let { nodeName, attributes, childNodes } = node,
                diffed = diff(node, ref)

            if (nodeName !== `${ref.nodeName}`.toLowerCase())
                return ref.parentElement.replaceChild(
                    create(node),
                    ref
                )

            applyAttributes(diffed.attributes, ref)

            childNodes.forEach((child, index) =>
                typeof ref.childNodes[index] !== "undefined"
                    ? applyDiff(child, ref.childNodes[index])
                    : ref.appendChild(create(child))
            )

            // Stop if childNodes doesn't overflow
            if (childNodes.length >= ref.childNodes.length) return

            Array.apply(
                null,
                new Array(ref.childNodes.length - childNodes.length)
            )
                .map((_, index) => index + childNodes.length)
                .reverse() // Otherwise child stack will auto update
                .forEach(index =>
                    ref.removeChild(ref.childNodes[index])
                )
        }

        applyDiff(node, element.childNodes[0])
    }
ในที่สุดก็ทำสำเร็จ! ตอนนี้เราได้
- เปรียบเทียบหาว่ามีอะไรที่ต้องเปลี่ยนไปบ้าง (Diffing)
- สร้าง Element จาก Object ที่มีแล้วไป Update
- การหา Element Reference เพื่อไป Update
ได้เรียบร้อยแล้ว!

render กับ node จริงไปเลย
let b = createElement(
    "h1",
    { style: { fontSize: "14px", color: "grey" } },
    "Hello World"
)

let c = createElement(
    "h1",
    { style: { fontSize: "16px", color: "grey" } },
    "Hello"
)
ซึ่งถ้าทุกอย่างถูกต้อง object ทั้ง 2 อันนี้จะต้องถูก diff ได้เป็นแค่
{
    nodeName: false,
    attributes: {
        style: {
            'fontSize': "16px"
        }
    },
    childNodes: [
        "Hello"
    ]
}
ดังนั้นเรามาลอง render กันเลยดีกว่า~
document.addEventListener("DOMContentLoaded", () => {
    render(b, document.getElementById("root"))
    render(c, document.getElementById("root"))
})
ได้แล้ววววววววววว!!

Recap
ทุกวันนี้เราโชคดีมากที่เราสามารถใช้ VDOM ได้ง่ายโดยที่เราไม่จำเป็นที่จะต้องเขียนอะไรซับซ้อนแบบนี้ขึ้นมา
ที่พวกเราเห็นทั้งหมดนี้เป็นแค่หนึ่งใน Virtual DOM ของ React version 0.x ซึ่งยังไม่มี state, props, lifecycle hooks, jsx ซึ่งในยุคแรก React ก็ยังไม่มี jsx ก็เขียนโดยการใช้ createElement ซ้อนกันไปเรื่อยๆ จนเกิดเป็นทั้งเว็บขึ้นมา
ในปัจจุบัน React ไม่ได้ใช้การเทียบ DOM จากบนสุดลงล่างสุดเหมือนที่เราเขียนขึ้นมาอย่างเดียว ตั้งแต่ React 16 (React Fiber) ถูก announce ออกมา ทางทีม React ได้พัฒนา diffing ที่เร็วและดีกว่าเดิมมากโดยการใช้ algorithms ต่างๆ กันกำหนด key และการตั้ง queue และ priority update
จะเห็นว่าแค่ Virtual DOM ธรรมดาๆ ที่เราเขียนกันแบบไม่มีอะไรยังทำเอายากและมีเนื้อหาได้ยาวขนาดนี้ ก็คงไม่ต้องคิดเลยว่าเราโชคดีแค่ไหนที่เราไม่ต้องเขียนทั้งหมดนี้ขึ้นเอง
สำหรับ Code ทั้งหมดของบทความนี้ถูกเก็บไว้บน Github ซึ่งสามารถลอง clone ได้ดูได้เหลือจะลองเล่นกับ Live Demo ดูก็ได้เหมือนกัน
นอกจากนี้ Virtual DOM ใน Implementation ของแต่ละคน แต่ละ Library ก็ต่างกัน เพราะว่าวิธีการเขียนโปรแกรมขึ้นมาไม่มีวิธีที่ตายตัว ขึ้นอยู่กับจินตนาการและความสามารถของโปรแกรมเมอร์แต่ละคน
ซึ่งในบทความที่นี้ที่อ่านมาทั้งหมดคือมาจาก Challenge ที่อยู่ๆ ก็คิดขึ้นมาว่า "ถ้าเราจะเขียน VDOM เอง เราจะทำได้ไหมนะ?" ก็เลยลองสร้างขึ้นมาดู ซึ่งแอบใช้เวลา 2 ชั่วโมงเลย
ดังนั้นหลังจากอ่านทั้งหมดแล้ว เราขอ Challenge ให้ลองสร้าง Virtual DOM ขึ้นมาเองดูสิว่าเราจะสามารถที่จะทำได้ไหม!